In this, the first post covering content from the 70-411 Administering Windows Server 2012 exam, I’m going to look at deploying & managing server images using Windows Deployment Services (WDS). WDS can be used to automate the deployment of standard or custom images to servers, which can dramatically speed up deployment if you have a significant number to install.
WDS can be installed as a role on a Active Directory Domain Services (ADDS) connected or standalone server. The minimum prerequisites for installing WDS are
- An ADDS server is required if WDS is to be integrated into Active Directory
- A DHCP server on the network required to support PXE boot
- DNS
- Image store must reside on a NTFS volume
- Credentials – must be a member of the local admins group on the server to install WDS
- WDS is not supported on a server running Server Core
Installing WDS using Server Manager
Install WDS as a role on the target server via Server Manager. You will automatically be prompted to install the necessary management tools It can be deployed with the combined Deployment Server role and Transport Server role service, shown below or with just the transport server only (less common).

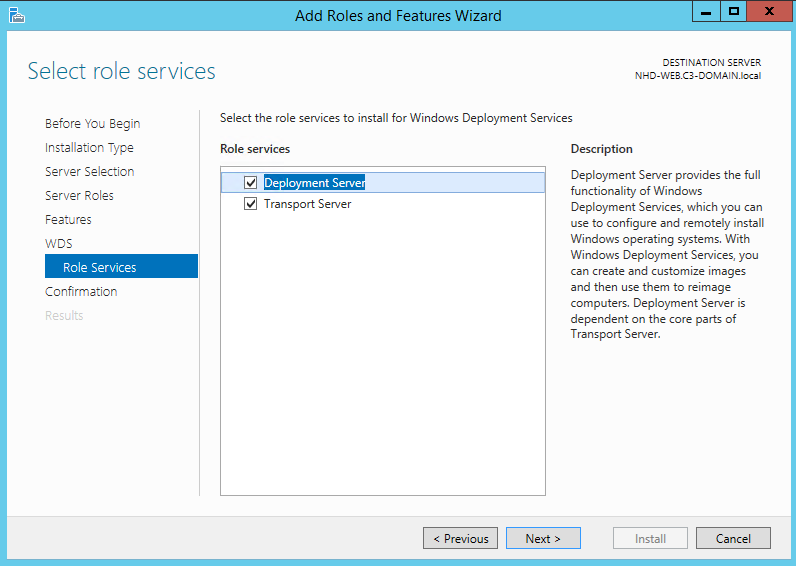
Deployment Server – Provides full functionality of WDS, deployment server is dependent on the core parts of the Transport server
Transport Server – Includes the core networking parts of WDS including PXE server. All configuration and management of images and their deployment requires customer scripts and the use of WDSUtil.exe. You can’t use PowerShell or GUI to configure the Transport Server.
Installing WDS usinfg PowerShell
Windows Server 2012 R2 provides a WDS PowerShell module which provides almost 100% of WDS functionality. All WDS tasks can be performed using PowerShell. To install WDS using PowerShell use the command below.
Install-WindowsFeature –Name WDS –ComputerName “LIV-DC1” -IncludeManagementTools
Configuring WDS
Before WDS can be used some initial configuration decisions must be made
1. AD DS integrated or stand-alone server – AD DS option only available in a AD DS domain environment
2. Location of the Remote Installation Folder – Must be on a NTFS formatted volume with enough space to hold the server images, driver packages and applications.
3. Initial PXE server settings – Control which clients can download images. None, only presaged clients or any PXE client that requests an image
Configuring and Managing Boot, Install, Capture and Discover Images
WDS uses four types of images, Boot, Install, Capture & Discover. Each type is detailed below.
Boot Images – Windows PE images that reside in the \sources folder on the windows installation media as \sources\boot.wim.
Install Images – Actual operating system images that are deployed to the client computer. The default images is located in the \sources folder as \sources\install.wim. Create custom images using a capture image.
Capture Images – Used to create custom install image from an existing template computer. Prepare the template computer using sysprep, then boot using the capture image. Must have sufficient disk space on the template computer to save the captured image to a local volume
Discover Images – Used by client computers that do not support PXE boot. Need Boot.wim file and tools from the Windows ADK for Windows 8.1
Managing Images in the WDS Image Store
You can copy, disable, enable, import, export, remove and set the properties of images within a WDS image store by using the GUI or PowerShell.
Use the Add Image Wizard in the WDS console or the Import-WDS* cmdlets in PowerShell to add images to the image store.
WDS organizes install images into an image group to enable them to share common file resources and security, you must create at least one image group.
Import-WdsInstallImage -Path “< WIM or VHD Location >” -ImageGroup “< GroupName >”
Import-WdsBootImage -Path “< WIM or VHD Location >”
To copy an image from one image group to another use the Export-WDSInstallImage and Import-WDSInstallImage cmdlets. The WDSInstallImage cmdlets allows you to copy an image only within the same group.
Updating Images with Security Updates, Hotfixes & Drivers
Use a capture image to create an updated install image that includes current hot fixes and updates, or use DISM commands and PowerShell to mount an offline image and update it directly.
You can directly modify an offline image (.wim) or virtual hard disk (vhd or vhdx) with the DISM cmdlets.
To modify an image or VHD by inserting an update into it, follow these steps
- Set the image to read-write by clearing any read only attributes, with attrib –r
- Mount the image using the Mount-WindowsImage cmdlets
- Extract the contents of the update, using Win RAR
- Inject the CAB file into the mounted image using the Add-WindowsPackage cmdlets
- Commit the changes and unmount the install image using the Save-WindowsImage & Dismount-WindowsImage cmdlets
Installing or Removing Features in Offline Images
Add or remove Windows features in existing images or VHD by using the following two cmdlets
- Enable-WindowsOptionalFeature
- Disable-WindowsOptionalFeature
It’s possible to modify the current running image using the –online parameter, or modify an offline image or VHD by mounting it and modifying the mounted image.
To modify an offline image follow these steps
- Set the image to read-write by clearing the read only attribute (attrib –r)
- Mount the image using the Mount-WindowsImage cmdlet
- Modify the image using the Enable-WindowsOptionalFeature or the Disable-WindowsOptionalFeature cmdlet
- Commit the changes and dismount the install image by using the Save-WindowsImage and Dismount-WindowsImage cmdlets
Capturing a New Template Image
When substantial changes are required, or there is a change to the underlying hardware it’s often better to create a new template computer and then capture an image from it.
- Create a capture image in the WDS console, right click a boot image and select “Create Capture Image”
- Add the capture image to the WDS image store
- Deploy Windows to the computer that will act as the template
- Install roles and features that will be part of the template
- Install any additional software to be part of the template
- Apply all updates and hotfixes
- Disable or remove any packages that should not be deployed on the target computers
- Run SYSPREP on the template computer Sysprep /oobe /generalize /reboot
- Restart the computer and boot from the network
- Select the capture boot image you created
Configuring Driver Groups and Packages
WDS allows you to add hardware specific drivers to your deployment images, and allow images to request a specific set of drivers from the available driver store.
You can create driver groups to host and organise collections of drivers, the default driver group is called “DriverGroup1”
You can use the WDS console to add / remove driver groups, rename or duplicate, modify the properties of the driver groups.
In addition to the WDS console you can use PowerShell cmdlets to manage driver groups – It is not possible to create new driver groups using PowerShell.
The following cmdlets are available
- Add-WdsDriverPackage
- Disable-WdsDriverPackage
- Enable-WdsDriverPackage
- Get-WdsDriverPackage
- Import-WdsDriverPackage
- Remove-WdsDriverPackage
You can inject drivers into an existing image or virtual HDD by using the Add-WdsDriverPackage cmdlets. After the driver package has been added to an existing image you can’t remove the driver package, you would need to recreate the image without the driver installed.
For a full list of WDS PowerShell cmdlets visit
https://technet.microsoft.com/en-us/library/dn283416.aspx
So that concludes WDS, it well worth working through a few demos as preparation for the exam, and know the PowerShell version of the commands.
Thanks for reading
TSP Admin