In this, the first of three articles which cover the 2nd objective domain (Configure File & Storage Solutions) of the 70-412 Microsoft exam we take a look at “Configuring Advanced Files Services”. In this post we will cover BranchCache, FSRM (File Server Resource Manager), and File Access Auditing. Lets get started with the first of the threes subjects – BranchCache…
BranchCache
Feature of 2012 that uses file caching to reduce network traffic across WAN links
How the files are cached depends on the mode of operation
- Hosted Cache Mode – Configure a server at the branch office as the hosted cache server. Whenever a client tries to retrieve BranchCache enabled content at the main office the client first checks (transparently to the user) the hosted cache server to see if the content is available locally. If it’s not available locally the client gets the content from the main office and stores it locally on the hosted cache server
- Distributed Cache Mode – Content is stored on client computers. When a client attempts to retrieve BranchCache enabled content from the main office the client first (and transparently to the user) broadcasts the local subnet to see if the content is available locally on another client. If it is not available the client retrieves the content from the main office and stores it in its local cache for others to use.
Configuring BranchCache
Branchcache can be configured to cache 3 types of data
- Web data
- File Server Data
- Data from apps based on the Background Intelligent Transfer Service (BITS). For example Windows Server Update Services, System Center Configuration Manager.
To configure you first need to configure the content servers, if you are going to use it in Hosted mode you need to configure the hosted servers’ cache. Then finally configure the clients.
Configuring the Content Servers
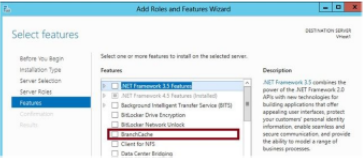
If the content server is a Web Server or BITS server, install the BranchCache Feature. Use PowerShell or the Add roles and Features applet from within Server Manager. The PowerShell cmdlet is shown below
Install-WindowsFeature BranchCache-IncludeManagementTools
Or use Add Roles and Features
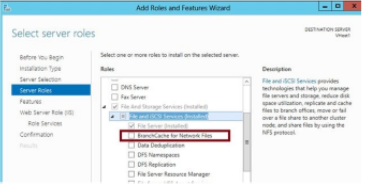
However, if the content server is a File Server you need to install a different component. Install BranchCache for Network Files (Role Service). Again use either PowerShell or Add Roles and Features.
Install WindowsFeature FS-Branchcache – IncludeManagementTools
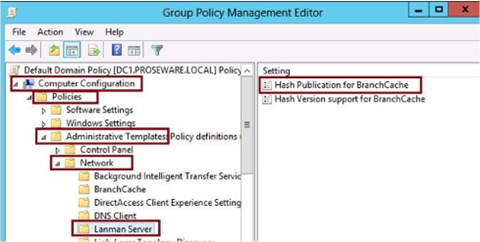
The BranchCache enabled file servers also require you to turn on hash publication, this can be done through the local policy or group policy (via a GPO)
Configure The Hosted Cache Servers (Branch Office)
To configure a hosted cache server at a branch office, complete the following steps.
- First install the BranchCache feature on a server running 2012 or 2012 R2
- Run the Enable-BCHostedServer cmdlet with the -RegisterSCP switch if the server is joined to a domain. Enable-BCHostedServer – RegisterSCP
To verify the local server has been configured as a hosted cache server run the Get-BCStatus cmdlet
At this point it is advisable to preload the hosted cache server with content from the BranchCache enabled web and file servers
To do so, do the following 3 steps using PowerShell
- Generate hashes of the content to stage on each server
- Publish-BCFileContent
- Publish-BCWebContent
- Export the staged data into a package
- Export-CBCachePackage
- Import the package on each hosted cache server
- Transfer the package to the hosted cache server using the method of your choice
- Import-CBCachePackage
Configuring BranchCache Clients for Distributed Cache Mode (Branch Office)
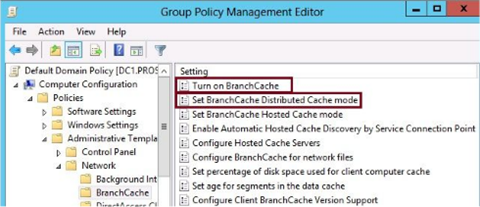
To configure the clients for Distributed Cache mode either use Group Policy or PowerShell
- If you use group policy enable these two settings
- To use PowerShell run the Enable-BCDistributed cmdlet on every Windows 7, 8 & 8.1 client you need the feature enabled on
Configuring BranchCache Clients for Hosted Cache Mode (Branch Office)
Configure the clients using either Group Policy or PowerShell, to use a GPO set or configure the options below

- To use PowerShell run the Enable-BCHostedClient of every Windows 8 client you want to use with Hosted Cache mode
- Windows 7 Compatibility – The Policies detailed above don’t apply to Windows 7 or Server 2008 R2 Clients. The Policy setting “Set BranchCache Hosted Cache Mode” enables Win 7, 8, 8.1 clients for Hosted cache mode. Limitation is that you can only specify a single Hosted cache server as opposed to specifying a list.
What you need to remember about these two similar settings….
If a question asks how to configure clients with more that one hosted cache server the answer is to enable the hosted cache server policy setting.
If the question requires both Win 7 and 8 clients, the answer is to enable the Hosted Cache Mode policy setting.
Hosted Cache Server Discovery
If you require you Win 8, 8.1, Server 2012, 2012R2 clients to automatically discover hosted cache server enable the setting “Enable Automatic Hosted Cache Discovery by Service Connection Point”
Using File Server Resource Manager (FSRM)
Allows you to perform advanced file management tasks
- Implement File Screens
- Apply per-folder quotas
- Configure File Classification Tasks
- Run Storage Reports
- Configure File Management Tasks
File Screens
Allows you to block users from saving files with specific file names to specific folders, and also stops users copying mp3s (for example) to a server file share.
They work by using file groups, which are a set of pre-existing patterns based on common file name extensions (for example audio and video files)
It’s also possible to configure exclusions in the file group. For example, you want to block all video files apart from avi files, you are able to configure an exclusion to do this.
File Groups can be configured to enforce a specific naming policy, prevents users saving files unless the use a specific naming format.
A File Screen Template allows you to apply one or more file groups to a specific path, advantage is that you can apply the same template in many locations. When configuring a template you need to decide if it will actually block files or report that the user has saved a file that meets a specific file name pattern
When configuring templates you can configure the following actions to occur
- Active Screening or Passive Screening – Active blocks files being written. Use Passive when you need to monitor what files are written to a specific path
- Send Email Message – Send email to user who attempted to save the file, to an admin or both
- Run script or command
- Generate an event log item
- Create a report – Create a storage report that is sent to the user who triggered the file screen
Quotas
Apply storage limits based on specific folder paths. Apply different quotas to different paths on the same volume. This makes them superior to NTFS quotas
- Hard Quota – User cannot exceed the limit
- Soft Quota – Users can exceed the limit
- Notification Thresholds – When the quota limit is exceeded you can trigger an event log, run a script or command, generate a report
Storage Reports
View information about files stored in particular paths
- Duplicate files – Locate duplicate files within a path
- File Screen Audit – View files screen information
- Files by File Group – Determine the number of files for a specific file group
- Files by Owner – Report detailing number of files on the basis of the owner
- Files by Property – Report based on the property of a file
- Folders by Property – Report of folders based on the property of a folder
- Large Files – Detail files over a specific size
- Least Recently Accessed
- Most Recently Accessed
- Quota Usage – Quota usage report
File Management Tasks
Allows you to automate the process of finding files that have a set of properties, applied through file classification – then performing tasks on those files
For example – Configure a file expiration tasks that looks for files that have not been accessed for a specific number of days, then automatically move them to a archived folder.
Can configure file management tasks based on the following
- Location
- Classification Properties
- Creation Time
- Modification Time
- Last Accessed Time
Implementing File Access Auditing
Need a record of when and how users access specific files and folders, to enable…
- Enable Auditing in Group Policy
- Audit object access generally by enabling the Audit Object Access Policy located in Computer Configuration\Policies\Windows Settings\Security Settings\Local Policies\Audit Policy Node
- To audit File and Folder Access specifically enable the Audit File System Policy located in Computer Configuration\Policies\Windows Settings\Security Settings\Advanced Audit Policy Configuration\Audit Policies\Object Access Node
- Configure the items you want to track so they will be audited. When you configure a audit entry you choose the following
- The security Principle to audit (user, computer, group)
- Whether to audit success or failure
- Whether to audit a single file or whole folder
- Whether to limit the scope of auditing for example, only audit if access occurs from computers that are members of a specific security group
So that coverts the Configure Advanced File Services objectives. Enjoy!
Thanks for reading – TSP Admin
![]()