The third objective domain covered by the 70-412 Microsoft exam deals with Business Continuity & Disaster Recovery. In this, the first of three posts covering this domain we take a detailed look at backups. What tools are available? What can be backed up and how? Who can perform a backup, and how is it all configured? So read on….
Windows Server Backup Feature
Windows Server Backup is installed by default, but its not possible to use it until the feature is installed. Install using the “Add Roles & Features” wizard or by PowerShell.
Install-WindowsFeature Windows-Server-Backup
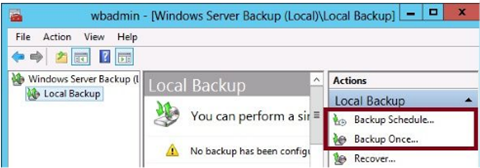
Once installed two backup wizards become available, which are “Backup Schedule Wizard” & “The Backup Once Wizard” (see below)
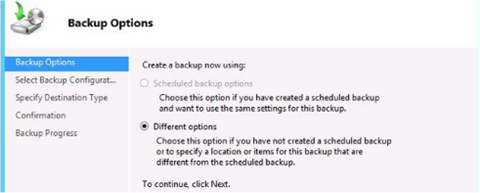
Backup Options Page (Backup once wizard)
Only available in the Backup Once wizard, two options are available.
- First option, only available if you have already configured a scheduled backup for the local server. Lets you make an immediate backup of the same items already configured for the scheduled backup.
- Second option allows an immediate backup with options that have not been configured with the scheduled backup.
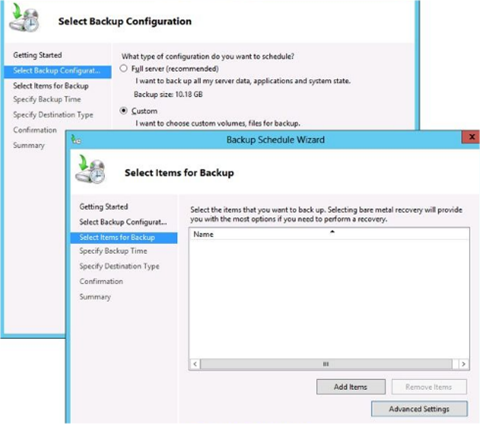
Select Backup Configuration Page
Here you decide to perform a full server backup or a custom backup
Full Server Backup – Includes all data on the system and lets you perform any type of recovery, including a system state or bare metal recovery.
Custom Backup – This can be a full backup or a subset of volumes, folders or files. It also allows some advanced configuration choices such as creating exclusions, and changing VSS settings.
Select Items For Backup
On this page add the items to be backed up, click advanced to adjust some default configuration settings.
Add Items
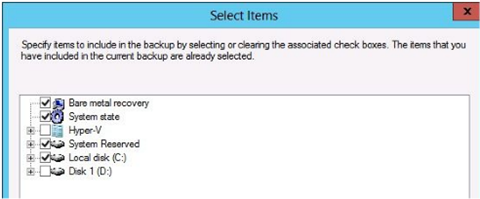
Click add items and a select items dialog box opens
Bare Metal Recovery – This item is a shortcut that selects the components required for a Bare Metal Recovery. The system state & system disk (typically C:) are automatically selected along with any system reserved partition. Bare Metal Recovery lets you boot a restored version of the system on a server that is not loaded with any software. Can be the original system with newly formatted disks or can be another identical system.
System State – Contains only the system files and configuration data of the local server, restoring these files would restore the configuration state of the server as it existed at the time of the backup. If the OS on the server becomes corrupted, you can use system state data to repair the server and get it into a bootable state. System state includes the following
- Registry
- Com+ class registration database
- Boot files, including system files
- System files under windows file protection
- If the server is a DC
- AD Service
- SYSVOL directory
- Certain server roles such as DHCP, ADCS, & DNS
Hyper-V – If the local server is a Hyper-V host you will be able to select each hosted VM for backup
Individual Files and Folders – Select individual volumes, files or folders for backup
Advanced Settings
If you click advanced settings, the dialog box for these option opens.
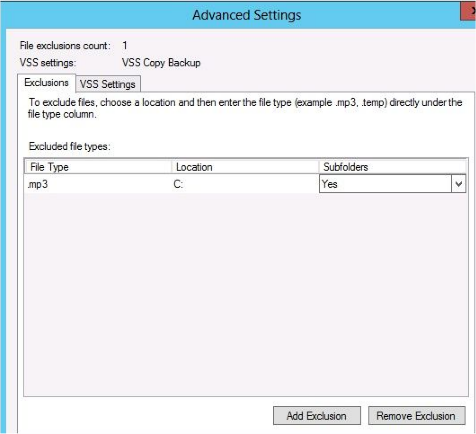 Configuring Exclusions – Perhaps you need to perform a backup more quickly, use less space or less network traffic than the current backup. In the example to the left we are excluding mp3 files.
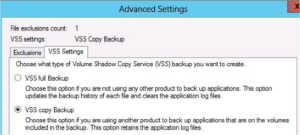
VVS Settings – Volume Shadow Copy Service. A background service which creates backups of all files, even ones locked by applications. All backups performed by Windows Server Backups are VSS backups, so these setting are always applied.
VSS Full Backup – Files backed up are marked as backed up in the appropriate application log, use this option when you are not using any other backup application.
VSS Copy Backup – Default selection. With this option, backed up files are not marked as backed up, so the backup does not interfere with any other backup applications.
Destination Type
Specify a location to store the backup
- Dedicated HDD – Only available for scheduled backups, offers best performance.
- Backup to a Volume – Only available for scheduled backups, applies to non dedicated volumes and mapped drives.
- Local Drives – Only available for the Backup Once option, have the ability to burn a backup to an optical drive.
- Remote Shared Folder – Available to both schedule and once options. Limitation is that only one backup can be stored at the remote location. This option overwrites the previous backup.
Performance Settings
Configured in the Windows Server Backup Console, they allow you to make backups quicker at the expense of longer restore times. To view, click configure performance settings.
This opens the optimize backup performance dialog, which allows two options
Normal Backup Performance – Default, full backups performed
Faster Backup Performance – Incremental backups are performed
Command Line Tools for Backup
2 utilities available, wbadmin.exe & PowerShell, At command prompt type wbadmin /? – Get-Command -Module WindowsServerBackup
Understanding Backup Operators
Only members of the local Administrators and local Backup Operators groups have the right to perform backups of files and directories on a given machine. Backup Operators are also given rights to restore files and directories and the right to shut down the system.
All 3 rights (backup, Restore & Shutdown) can be assigned separately via local computer policy or Group Policy, this gives you the ability to assign the backup right but not the other two, to a specific user or group.
Using the Shadow Copies Feature (Previous Versions)
Enable shadow copies of volumes after which snapshots of the volume are taken regularly. After you have enabled shadow copies on a volume, users can use the Previous Versions feature to restore a previous snapshot of any file or folder the users own on that volume. Right click a file and select “Restore Previous Versions” which will then open the previous version tab. The user can then select the desired file to restore.
VSSAdmin is the command line tool for managing shadow copies and the Previous Versions feature.
Windows Azure Backup
Online backup feature that lets you perform individual server backups to the cloud
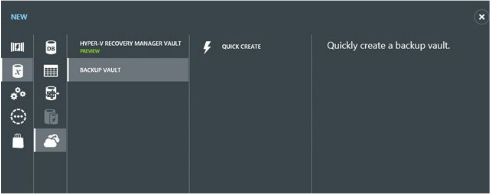
- Create a Windows Azure Account – First step in configuring online backups, create an account then create a backup vault. Create the vault using Windows Azure Management console.
- Create a Vault and add a Certificate – Create the recovery vault to store the backups. Then you need to upload a management certificate to Azure. Obtain the cert from a online CA, or a CA managed by your organization (ADCS) or create a self signed cert using Makecert.exe (command line tool).
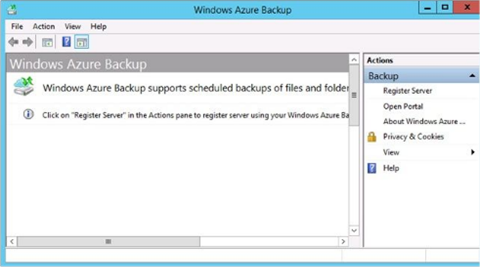
- Download and Install the Windows Azure Backup Agent – Download the backup agent and install locally on the server. The agent can be used to backup a single server to Azure or used to allow System Centre 2012 R2 Data Protection Manager to perform backups to Azure.
- Register your Server – Registering a server enables you to perform backups from that server only. You can register multiple servers with the same recovery vault and with the same Azure account. Register server wizard has a number of configuration steps.
- Proxy Server
- Specify the certificate again
- Chose the Azure vault to same the backups too
- Specify a passphrase to encrypt the backup, specify a location to save the passphrase in a file. The passphrase is needed to restore.
After registering a server new options for online backups appear, Schedule backups, Recover data, Change properties, Open Portal.
Creating a Schedule
To start the schedule backup wizard, click click “Schedule Backup.” The items you can select to backup are shown.
Specifying Retention Settings
Specify the number of days the backup cannot be overwritten or deleted to make space for another backup. This can be set to 7 days (default), 15 or 30 days.
Backup Now Option
Only appears as an option when the Schedule Backup Wizard has been completed. Can only be used to create addition backups of already existing backup sets, that have been previously used and configured. Cant be used to select a new set of volumes, folders or files.
Recover Data Option
Used to restore data that’s been backed up. Also have the ability to restore online backups to another server.
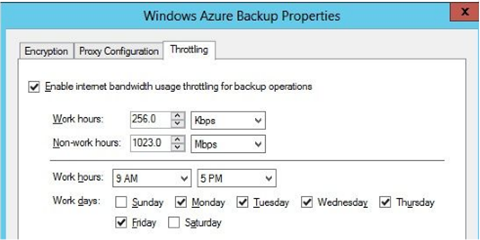
Enable Bandwidth Throttling
Restrict the amount of bandwidth used during backup operations.
This could appear on exam, you need to adjust settings above to reduce the impact on users. Maybe adjust work hours, lengthen the working day, or decrease the bandwidth currently assigned to work hours to prevent work day disruption, and increase bandwidth in non work hours to get backups done as quickly as possible.
So that concludes configuring and managing backups, we looked at the tools build into Windows Server and also the cloud offering via Azure cloud services.
Enjoy!
TSP Admin
