This post covers Dynamic Access Control, one of my favourite topics in the 70-412 Microsoft certification. I have to admit it took me a number of hours studying and experimenting in the lab to fully understand and commit all the parts to memory, however I think it’s one of the most powerful tools available in Windows Server 2012 and which the sysadmin can deploy, so lets get started
Dynamic Access control (DAC) relies on file classification, user & device attributes called claims, and on rules and policies built from these elements.
Through DAC you can configure access to files based on users AD attributes and the files contents.
For example – you could configure DAC to only allow access to files that contain the word “TOP_SECRET ” to those users whose AD account have an attribute that indicates a clearance level of TOP SECRET.
Introducing DAC
DAC is used in combination with NTFS file and share permissions, when combined the most restrictive permissions always apply to the account requesting access.
- User & Device attributes are called Claims
- File attributes are called classifications
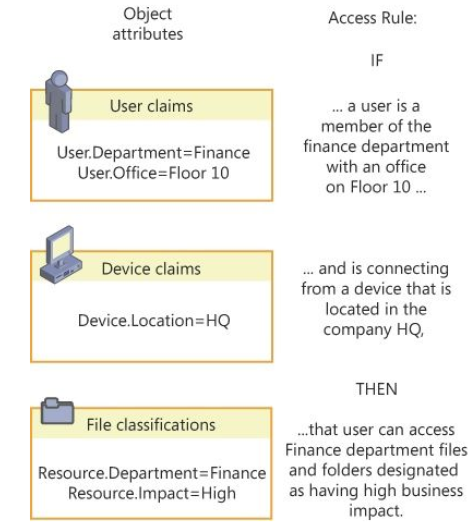
This allows admins to construct access rules that are much more flexible than standard users and groups. DAC gives you, the admin, the ability to create an ACL based on location, country/region, telephone number or any other parameter useful to you. See the example below
Requirements
- At least one 2012 or 2012 R2 file server
- At least one 2012 or 2012 R2 DC – One @ each site recommended
- Windows 7 clients or higher
- Domain Functional level = 2012 or higher
- Access-denied Assistance requires windows 8 or 8.1
Configuring Claims-Based Authentication
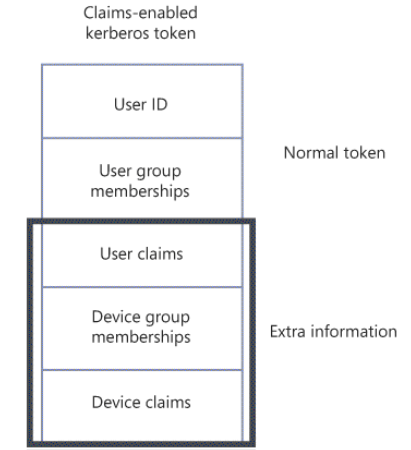
Kerberos is the authentication protocol used by Active Directory. Users are provided with a token when authenticated which defines user permissions.
DAC uses expanded Kerberos, this token includes more data than the usual user id and group memberships. It contains attribute values called claims plus additional claims about the device the user is signed on to. The extended token is shown below.
To configure a DAC policy, perform the following steps
Define the types of claims about users & devices that are required
User and device claim types, correspond to names of AD attributes. Use Active Directory Administrative Centre to configure the user and device claim types.
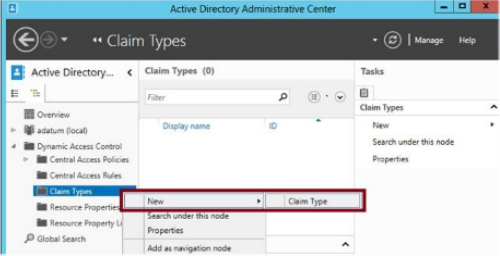
The Create Claim Type form opens. In the source selection, click the AD object you want to use as the basis of the claim type. Also specify if this applies to users or computers (devices) or both.
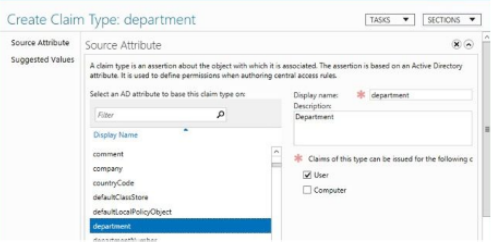
In the suggested Values section you can provide a list if matching values that will later be used in access rules. For example, if you plan to create an access rule that specifies a user or computers department you can pre-create strings such as Sales, Engineering, Operations etc
Configure ADDS to use expanded Kerberos tokens that includes the claims
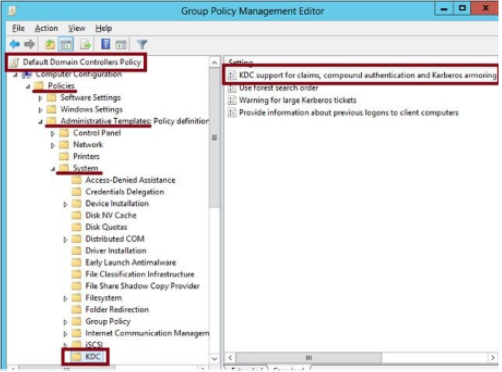
Next configure Group Policy to enable Kerberos support for claims on Domain Controllers. This step ensures the Kerberos tokens issued include claims information, which can be evaluated by DC for access authorization
In the GPO linked to the Domain Controllers OU enable the following setting
Computer Configuration/ Policies/ Administrative Templates/ System/ KDC/ KDC Support For Claims, Compound Authentication And Kerberos Armoring
Configuring File Classification
This is the process of adding attributes to the properties of files and folder, allows you to apply ACLs to these resources
The steps for configuring file classification are as follows
1. Enable or Create selected Resource Properties
Enable or create the resource properties on a DC running 2012 or later using ADAC. Add Resource properties to the Resource
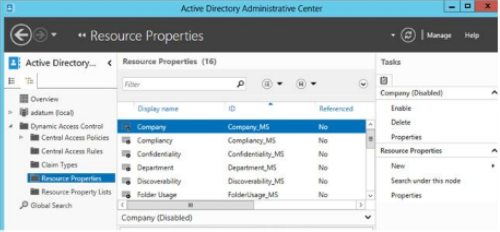
Resource properties correspond to attribute categories, such as department, that you can make appear on the classification tab of the properties dialog box of files and folders.
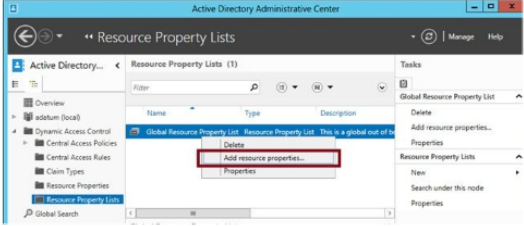
After you enable the resource properties you need to add them to a resource property list before they can be applied to objects. Select the Resource Properties container in ADAC, right click the list and add the resource properties you have enabled and click ok.
2. Update Active Directory file & folder objects
To update ADDS with the new classifiable properties the following cmdlet needs to be run on a file server which has the File Server Resource Manager (FSRM) component installed
Update-FSRMClassificationPropertyDefinition
After this, the resource properties chosen in step 1 appear on the classification tab of every file and folder on the file server.
3. Classify Files and Folders
Objects can be classified manually or automatically
- Manual Classification – Select and apply a resource property value on the Classification tab directly on selected files or folders. When you click apply classifications will automatically be applied to all child objects within the folder. Child objects keep the classification until they are reapplied. Do not inherit properties when they are moved. Classifications remain applied even when objects are copied from one computer to another, however you can only see and read them if you have installed FSRM and run the cmdlet detailed above
- Automatic Classification – Server 2012 & 2012R2 has a build in file classifier that can be configured to automatically classify all files within targeted folders, or it can be restricted to a subset of files.
To begin automatic file classification, install the FSRM role and navigate to the File Classification section
In the Actions pane click create new Classification rule
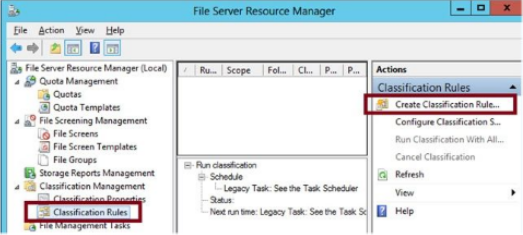 This opens the Create Classification Rule dialog box
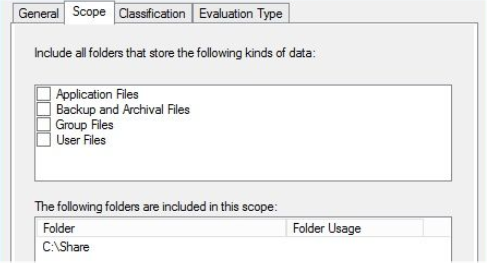
General Tab – Name & Description plus enable
Scope Tab – Select folders where the rule will apply, rule also applies to all sub folders of the parent
Classification Tab – Choose a classification method and the value for one selected property the rule will assign
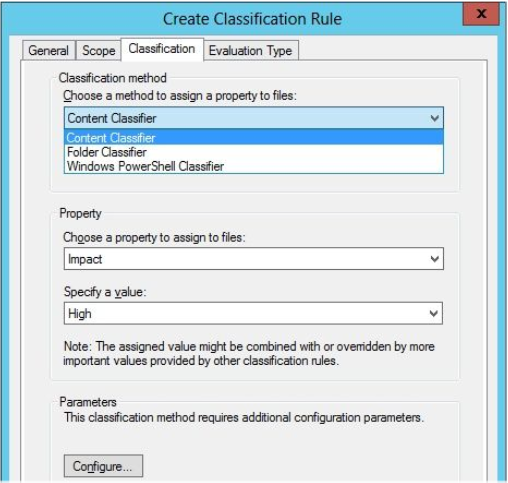
For the classification method there are 3 options
- The Folder Classifier – Assigns the property value to all files that fall within the scope of the rule
- Windows PowerShell Classifier – Specify a script which determines the target files with the rule scope
- The Content Classifier – Searches documents for a test or regular expression string
- Evaluation Type Tab – How to handle files that already exist in the rule scope, by default the classification rule does not apply to pre existing files.
Once the rule has been created configure a classification schedule using FSRM.
Access-denied Assistance
Configured using FSRM or via Group Policy, used to provide helpful information to users whose access to a file or folder has been denied. Can also be configured to provide a “Request Assistance button” which allows the denied user to send an email to a pre defined user.
Possible to use GP to configure Access Denied Assistance to all file servers which fall in the scope of the GPO. The 2 policy settings are both found in both found in Computer Configuration\ Policies\ Administrative Templates\ System\ Access-Denied Assistance
Enable Access-Denied Assistance On Client For All File Types – Use this to enable windows clients for access-denied assistance of all types
Customize Message for Access Denied Errors – The customized message displayed to users
Configuring Access Policies
Finally you are ready to create the access policies once you have assigned attributes to users, devices and files. To configure access policies perform the following steps
1. Create a Claims based central access policy – This consists of 2 parts, both of which are performed using ADAC
First create one or more Central Access Rules – Similar to an ACL which describe what conditions are required to grant access to the resource
a- Creating a new Central Access Rule – Use ADAC
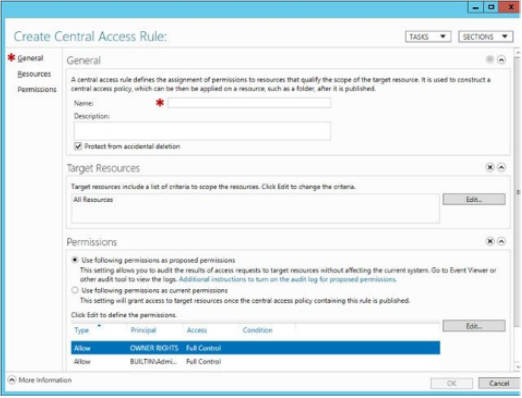
- Name – Give the rule a name
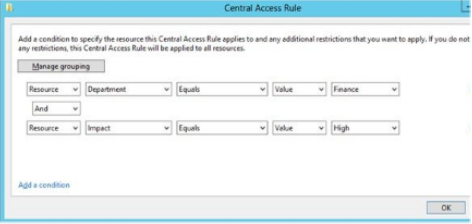
- Target Resources – Click edit and add the conditions that match the target resources for which you want to define access
- In the Permissions section select “Use Following Permissions as current Permissions” and click edit
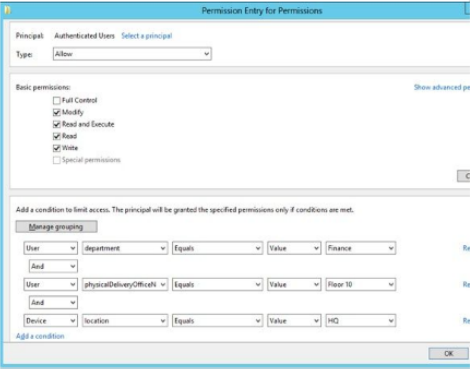
- At the top, select a principle, another name for a user or group
- Basic Permissions – Set the permission that you want to assign to users who match the rule
- Near the bottom, add conditions that users are required to match, for example – Department = finance and Office Value = Floor10 and signed on to computers whose accounts in AD have a location value = HQ
- If Authenticated users attempt to access the target resource and do not match these conditions they will be denied access (the exception is the file owner)
b-Then add the rules to the Central Access Policy – In ADAC click central access policies and create a new one. Give the policy a name and in the member section add the desired central access rules, click ok twice.
2-Use Group Policy to deploy this central access policy to your file servers – In a GPO linked to the Domain, navigate to:
Computer Configuration/ Policies/ Windows Settings/ Security Settings/ File System and click Central Access Policy
In the configuration dialog box add the Central Access Policies that you want to make available to the file servers.
When this setting is enforced, the central access policies appear on the dialog box below
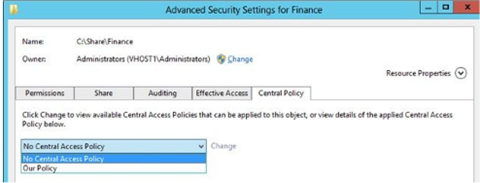
A Central Access Policy only applies for a file or folder when the admin selects and applies it manually in these Advanced Security Settings.
So as you can see, DAC is quite complex to set-up and configure, and not to be undertaken without a lot of thought, preparation and consideration. An incorrectly configured DAC solution could cause problems when deployed, so before considering this you should have a clear understanding of your infrastructure and organizational requirements.
There is a lot of information here and my plan is to support this with some educational videos to demonstrating many of the steps detailed in this post, so keep an eye out for those.
Thanks for reading
TSP Admin